Thứ Ba, 1 tháng 7, 2014

How to Put WordPress Site Offline?

0 nhận xét

How to Make WordPress Blog Private


WordPress Visibility option allows you to control who can visit your site, whether search engines will index it or not etc. In my last post, I discussed how to put blogger site offline. And in this post I'm gonna talk about WordPress. 


In my previous post, I discussed the reasons behind putting a site offline. Here I would like to repeat those reasons -

  • If your site is new, you can discourage search engines to index your site. Because a new site with insufficient content will not get a good rank.
  • If your site is private or subject to premium membership, you can disallow general people to view your contents.
  • Due to political violations or religious issues, if your social security is under threat, you can temporarily make your site unavailable instead of deleting it. 

WordPress Settings Option

Site Visibility Options
  1. Login to your WordPress site and go to Admin Panel.                                                         (ie. https://munnamark.wordpress.com/wp-admin)
  2. Go to Settings from the left pane and choose Reading. (As shown in the above image) (ie.https://munnamark.wordpress.com/wp-admin/options-reading.php)
  3. Now you will get the Reading Settings page.
  4. Move to the Site Visibility section. There you will get three choices. 
  5. The first choice is the default option. It allows search engines to index your site.
  6. The second choice forbid search engines to index your site.
  7. And the third option makes your site private. That means only invited persons will be able to access your site.
  8. Choose any of the three options that is suitable for you.

Site Visibility Option in WordPress


Note: You can change the settings at any time.


Adding Users in a Private Site

If you make your site private, then you have to manually invite members to your site. Only invited members is capable of viewing your contents or writing posts in your site. To invite users, follow the steps below:


WordPress Users Option

  1. Go to your WordPress control Panel
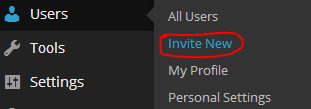
  2. Choose Users > Invite New (As shown in the above image)                                         (ie. yoursite/wp-admin/users.php?page=wpcom-invite-users)
  3. Now you will get the invite users form. Type username or their emails. Choose one of the five roles (Contributor/ Author/ Editor/ Administrator/ Follower) for the invited members. 
  4. Type an invitation message if necessary
  5. Finally hit on the Send Invitation button.

How to Invite New Users in WordPress


Then the invited user will get an email. If he accepts the invitation, you can view the member in the past invitation section. From there you can manage your members. 


Hope you've clearly understand the topic. If you have any confusion, don't hesitate to leave a comment. :)


Get more tips on Blogging . . . 


Stay with Marks PC Solution to get more interesting IT topics!


How to Put Blogger Site Offline?

0 nhận xét
Access Denied to Blogger Blog


Both Blogger and WordPress have an option to put the site offline or make it unavailable permanently or temporarily. You may need to put your site offline for a number of reasons. In this post, I will just talk about how to limit access to a blogger site. At the same time, you can deny the search engines to access your site and you can also restrict general people to view your contents. 


As mentioned earlier, there could be several reasons behind putting the site offline. Such as - 

  • You can restrict search engines to crawl your site. Because you would like to decorate your site first. In that case you can limit search engines' access. 
  • You may need to make your site unavailable temporarily due to political violations or religious issues. 
  • Or may be the site could be a private one. Maybe it's subject to be unavailable to the public. 

Whatever the reason, or even if you don't need to put your site offline, at least you should know the way. Some bloggers even think, why I put my site offline? When I'm trying to cirulate the site as much as possible? I've already mentioned the reasons! :)


Restrict Search Engines Crawl your Site

You can limit search engines' access to index your site if necessary. Follow the steps below - 

  1. Go to Blogger Control Panel/ Settings/ Dashboard.
  2. Choose Settings from the left pane.
  3. Select Basic > Basic > Privacy.
  4. Choose No for both options as below.
  5. Hit on the Save Changes button. 

 Privacy Option in Blogger Blog


The first No doesn't matter much. But the second No matters! If you choose No in the second option, your site will not be crawled by search engines. But everyone will be able to access your site.


Restrict Public Access to your Contents

If your site is private and you don't want people view your contents, then you can absolutely restrict public access. Follow the steps below - 

  1. Go to Blogger Control Panel > Settings.
  2. Choose Basic under the Settings option.
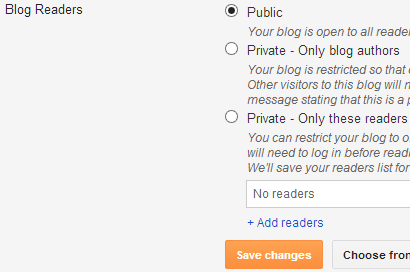
  3. Find the Blog Readers option under Permissions section.
  4. Here you have three choices: Public, Private (Blog Authors), Private (Selected Persons).
  5. If you choose the second option, only blog authors will be able to access the site. Other people will just get a message - This is a private blog
  6. If you would like to add some readers, then choose the third option. Then add readers from your contact list or you can type their emails. Whenever they try to access your site, they have to log in. 
  7. Finally, hit on the Save Changes button. 

Blog Readers Permission in Blogger Site


Tips!

If your site is totally new, then you can use the Privacy option only. You can stop search engine crawl your site. Because search engines will not find enough contents in a new site. That's why it's better to write first. Then you may let search engines to index your site. But you can keep your site Public. 


Later I will discuss the same thing for WordPress site. 


Get more tips on Blogging . . . 

Stay with Marks PC Solution to get more interesting IT topics!


Thứ Sáu, 16 tháng 5, 2014

Trues and Falses in Optimizing AdSense

0 nhận xét


Couple of days ago Google AdSense offered its first online course for the Publishers. And I've been too. The course will be opened on 20th May, 2014. Register now for the course and take a Pre-Course Assessment to justify your AdSense knowledge! 


Course Outline

  • Introduction

  • Unit 1 - CPM and CPC: Winning Valuable Ads

  • Unit 2 - Clicks and CTR: Designing and Placing Your Ads

  • Unit 3 - Impressions: Showing More Ads

  • Wrapping Up

  • Final Assessment 

Just after getting the invitation for the course, I took the Pre-Course Assessment Test. There are 15 questions. You just need to choose one of the options - True, False and I don't know. 

I scored 12 out of 15. This assessment will help you understand what you already know about AdSense and what you still have to learn. Have a look at the questions (modified) of Pre-Course Assessment - 

    1. Enabling both text and image ads increases the auction pressure for your website’s Ad and is very likely to increase your AdSense Earning. (True)
    2. Every page should have a 728x90 banner ad on it because this is the highest performing Ad Size. (False)
    3. Blocking Ad categories in AdSense account will not affect your revenue because the auction will just replace Ads from that category with ads from other categories. (False)
    4. You can put the same Ad unit into multiple custom channels. (True)
    5. AdSense Experiments can be used to test and compare the performance of different sizes or styles of your Ad units. (True)
    6. CPC and CTR are different acronyms for the same thing. Both of them measure how often users click on Ads. (False)
    7. The only way to be sure that you’ve put Ads in the right places on your site is to test frequently and understand the behavior of your users. (True)
    8. The best way to format text Ads is to blend/ mix with your content as much as possible. (False)
    9. If your page calls for an Ad to be served but no Ad is returned, this will be considered as an Ad request, a page view, and an impression. (False)
    10. In the AdSense auction, if Advertiser Sami bids $2.40 CPC, Advertiser Raj bids $2.10 CPC, and Advertiser Chris bids $2.15 CPC, Advertiser Sami wins and pays $2.40 for the impression. (False)
    11. With contextual targeting, the Google web crawler analyzes colors, images and videos to match ads to your content. (False)
    12. The number of AdSense Ads you can place on a desktop site is the same as you can place on a mobile site. (True)
    13. Page speed is important to Ad revenue because users are more likely to stay on your page and return again if the site loads faster. (True)
    14. If the AdSense crawler can't crawl a web page, the Ads displayed to that page may not be relevant to the page content. (True)
    15. A rejected Ad request occurs when site's content does not comply with AdSense policies. (False)


    Explanation of the False Ideas/ Concepts/ Notions


    Idea # 2

    728 x 90 Banner Ads perform well. But it doesn't mean that your page must have it. It  depends on your site's style and type. 

    Idea # 3

    Blocking non performing Ad categories may increase your revenue if done properly. But personally, I don't believe it - Learn more . . .


    Idea # 6


    CPC - Cost Per Click is the amount you earn each time when a user clicks on your Ad. CPC is determined by the Advertiser. 

    CTR - Click Through Rate is the number of clicks against pageviews. If you get 2 clicks against 10 pageviews, then your CTR is 20%.

    Idea # 8

    Blending Ad Units in such a way that users can't differentiate between Ads and Contents may be harmful for your AdSense account. Even you could be banned from AdSense program!

    Idea # 9

    If your page calls for an Ad to be served but no Ad is returned it will considered as rejected Ad request. 

    Idea # 10

    The Advertiser with the lowest CPC will win the bid. Advertiser Raj bids $2.10 CPC. So he will win the bid not Raj. 

    Idea # 11

    Contextual targeting analyzes your keywords, topics, text, language, link structure, page structure etc. It considers the central theme of your site rather than a single topic. To be honest, I don't know much about contextual targeting.  


    Idea # 15

    A rejected Ad request occurs when your page calls for an Ad to be served but no Ad is returned. But if your site doesn't comply with the AdSense policies, simply you will be banned from AdSense! 


    Stay with Marks PC Solution to get more interesting IT topics!


    Thứ Sáu, 2 tháng 5, 2014

    New Domain for Marks PC Solution!!!

    0 nhận xét


    On December 15, 2011, I started Marks PC Solution. And it was hosted on blogger. I've created thousands of links in blogs, forums, websites and social media. Now this site has 337 posts published. That's why I was reluctant to purchase a custom domain. But some of my online friends and the readers of Marks PC Solution advised and requested me to get a custom domain. 


    Finally with the help of +Anzaq ali I've purchased a domain from GoDaddy on April 29, 2014, costing $12/year. Now the new URL is http://www.markspcsolution.com/. I tried for this one - markspc.com but someone has secured this domain for sale. However I think this will be easier for the users to remember. Because munnamark.com doesn't carry any meaning. And markspcsolution.com is completely matched with the site title.


    Since Anzaq Ali created the domain on behalf of me, I can't show you the process. Because I need to show the screenshots. Anyway you can set up the URL from the Settings option of blogger. And at the same time, you need to create an account on any web hosting site ie. Go Daddy, Hostgrator, Bluehost etc. 


    Effects of URL Change


    Naturally you may wanna know what happens to my site after changing the URL In fact, there is no change in the number of visitors and pageviews. Because visitors are being redirected automatically from my previous URL (munnamark.blogspot.com) to new URL. So the amount of traffic is same. 


    But I've partially lost my SEO score, page rank, social rank, backlinks etc. The previous URL got PR 1. And I may get this back after few weeks. Alexa traffic rank was approximately 100000. And now it's showing 13235178! I can also get this back within few months. 


    But I've almost lost my Facebook Likes, Google +1s, Tweets. And certainly this will take few years to get back! 


    And I even don't know when it will be possible to create valuable backlinks throughout the web. Because I don't have enough time to write on other websites as I did before. 


    Get a Custom Domain as soon as Possible

    If you wanna be a professional blogger, please start with a custom domain. Whether you're using Blogger or WordPress, starting with your own domain is a better idea. Otherwise you will not be willing to change your URL after writing 100 posts. But you have to change the URL when the number of posts will cross 300! In that time you will think that changing the URL after publishing 3000 posts will not be a good idea. 

    That's why I have to make a tough decision . . . :) 


    Stay with Marks PC Solution to get more interesting IT topics!


    Thứ Năm, 1 tháng 5, 2014

    Google Countdown Timer

    0 nhận xét

    Google Alarm Clock


    Couple of weeks ago I shared Cook Timer with you. And you can use this timer as alarm clock. But do you know Google has a nice timer for you?! If you are familiar with the special search techniques of Google you should not be surprised. But your friends will be really amazed when they will see that you are using an alarm clock in Google homepage!


    Okay let's see how to do. First, go to Google. Now type any of the following queries as your wish - 
    • Google Timer
    • Timer
    • Count Down Timer
    • Countdown Timer
    I suggest you to use only Google Timer. Type Google Timer and hit enter. You will get the following timer in search result - 


    Google Countdown Timer


    The default option is 5 Minutes 0 Second. Simply press the start button to launch the timer. After 5 minutes, it will be ringing. 


    To change the alarm time, click on it. It will look like as - 


    00h  00m  00s


    You will get cursor there. You have to start with the Second (s) option. Type your seconds. If there is no second, then type 00. 

    Press left arrow key to move to the Minute option. If you need to set 3 minutes then type 3. By the say method, you can set hour. 


    Remember, you can't go directly to the Minute or Hour option. You have to go step by step. Even if Minute and Second is 0, you have to enter 00 there. 


    Features of the Timer
    • After starting the timer, you will see a progress bar. 
    • You can use the stop button to pause and reset button to start the timer from beginning. 
    • By mistake, if you close the Tab with timer running, you will get a message. 
    • This timer works in offline too. Suppose you've started the timer when you were online. But if your net gets disconnected, it will be working. But you must keep your browser running. 


    Stay with Marks PC Solution to get more interesting IT topics!


    Thứ Sáu, 25 tháng 4, 2014

    Bliss - World's Most Viewed Photo!

    0 nhận xét

    Bliss - The Most Viewed Photo of the World


    Windows users are certianly familiar with the default wallpaper of Windows XP - Bliss. In fact, most of the people are familiar with the Bliss wallpaper even not being a computer user! Over the last decade it's been the most viewed as well as famous photo of the world. You should know Microsoft has stopped providing technical support for Windows XP from April 08, 2014. And now it's time to say Goodbye to this popular operating system. 


    Microsoft purchased this photo from Charles O'Rear who is a former National Geographic photographer. Microsoft team visited his house before saying goodbye to Windows XP. You can watch the interview in YouTube


    The Story Behind Bliss Wallpaper

    Bliss is the default desktop wallpaper of Microsoft Windows XP. It is an image of a rolling green hill and a blue sky with clouds. Only few people can recognize this picture as natural. Most of us think that it's graphically manipulated. But the photographer said - it was not! Have a look - 


    The Default Wallpaper of Microsoft Windows XP


    This photo was taken by Charles O'Rear, former National Geographic photographer, a resident of Napa Valley, in January, 1998. O'Rear was on his way to meet his Girl Friend Daphne Irwin (who he later married). He saw the hill free of vineyears. The grass was perfect green. There was bright sunshine with clouds in the blue sky. 


    Charles O'Rear


    O'Rear stopped somewhere near the Napa-Sonoma county line and set his Mamiya RZ67 Medium-Format camera on a stand. He chose Fuji film for its excellent quality. He took four pictures and later one of these was licensed by Microsoft. 


    Mamiya RZ67 Medium-Format Camera


    Charles also said that many photographer took the picture of same area of California. But he was really lucky. Because the light was great. The sky was little bit cloudy and green. The hillside was covered by green grass. But normally there is only grapevines. 


    Bliss Location on World Map

    This map is showing the approximate location where the Bliss image area is located. The exact position is 38.2489660 North and 122.410269West. 


    8 years later, on November 27, 2006, Goldin+Senneby visited the site in Sonoma Valley where the Bliss image was taken. The same location was completely different. That place was full of vines. Have a look . . . 

    Bliss Location in November 2006


    Stay with Marks PC Solution to get more interesting IT topics!


    Thứ Bảy, 5 tháng 4, 2014

    Marks PC Got a New CPU!

    0 nhận xét


    Finally I've got a new system unit! I purchased the CPU in April 02, 2014. I was very busy with transferring my files from old PC. So I didn't get enough time to write about my new CPU. In this post I'm gonna share my experience with you. And I also would like to give you some tips which you can follow before and after buying a new PC. 


    In fact, I'm suffering with my old PC for more than a year. It shuts down without notice. And there is no definite pattern of shutting down. Actually the parts are 5.5 years old. So I didn't think about repairing. I've purchased a new system unit. 


    I would like to start with my CPU configuration:

    • Processor: Intel Core i3-3220, 3.3 GHz (4 CPUs), 3MB Cache
    • System/Mainboard: GIGABYTE H61M-S2PV, LGA 1155 (Ultra Durable)
    • Memory: Team Elite 4GB DDR3 RAM with 1600 Bus Speed
    • Hard Drive: Samsung 1 TB HD 103SM
    • DVD Drive: HP DVD Writer 1265
    • Casing: San ATX Casing (E011B) with High Watt Power Supply

    After assembling the CPU, the seller asked me to power on the system. I pushed the power button but it didn't run! Then he checked the connectors, power cords and everything. My father was there. He advised to check the power switch. 

    Then the seller used reset switch to turn on the system. And it worked! What happened actually? There was a fault in the power button. After changing the internal connector of  the power button, it worked fine. 


    Total Cost is approximately $ 340. 3-year warranty for Mainboard and CPU. Product lifetime warranty for RAM. Hard Disk and DVD writer get 1 year warranty. 

    Here is my system rating

    Windows 8 System Rating


    Now I'd like to discuss what to do before and after buying a new PC. 


    Before you Purchase - Think
    • What do you do using PC?
    • How much heavier your tasks are? Gaming, Graphics or Official Tasks? 
    • How much you know about configuration? Are you an expert or novice? 
    • Do you have a familiar PC shop which you can trust? How much expert they are?

    Before buying a PC, you must think about these questions. You should also think about warranty. Because computer equipments could be damaged any time. Even best quality product can't guarantee that it wouldn't be damaged. But a good brand can ensure warranty service.  


    You must think about your activities before purchasing a PC. What type of PC you should buy depends on your tasks. Heavier tasks like graphics, gaming requires a heavier system. But if you only browse Internet and work with Microsoft Office, then dual core PC with 2 GB RAM is enough for you. 


    If you're expert about PC, then it's okay. But if you're just a beginner or don't have much idea about configuration, then you should talk to an expert. Or at least you can talk to a friend who has a good idea. 


    Finally, choose a better outlet from where you will buy the computer. Never choose a shop which offers low price PC. I swear, you have to suffer with defective parts. Just tell the seller one thing - I need a quality CPU. Price doesn't matter. Because some sellers cut the price to match your budget. And often they give you poor quality parts to reduce the price. 


    You must also ensure that you will get warranty for important equipments like Motherboard, Processor, RAM, Hard Disk etc. 


    When you Purchase - Observe

    When you're at the purchase point, you should observe the assembling procedure. Make sure that, the person assembling your CPU is an expert. Otherwise equipments could be damaged due to the wrong handling. 
    • Be sure that every equipment is new. Check the packet before opening an equipment. Make sure that the product is properly sealed in the packet with sticker. If the seal is broken, inform the seller and ask him to give you a new one. 
    • Check the installation of processor. Make sure that, CPU fan is properly installed.
    • There are usually 06 points in a motherboard. Make sure all of them are properly inserted into the casing.
    • Be sure that internal connectors are properly connected. 
    • Check the USB ports with a flash drive if possible and necessary.
    • Any loose connections may be the cause of danger. So be sure, there is no loose connections.
    • When the assembling is complete, turn on your system properly. And make sure everything is working perfectly. 

    Before leaving the shop, don't forget to pack your equipments properly. Take the necessary documents - warranty papers, money receipt etc. Take the CD/ DVDs that come with the products. Ask the seller for any advice that can increase your computer life so that you shouldn't come back for warranty! 


    After you Purchase - Ensure Proper Maintenance

    A computer could be a machine. But it needs proper maintenance just like a human body. And you must take some precautionary measures to avoid any occurrence. Here are some tips for you: 
    • Place the system in a cool and dry place. 
    • Keep the surrounding area clean to keep the dust minimum.
    • Use Voltage Stabilizer and UPS to avoid any damage. 
    • Connect the cords using a good quality multiplug. 
    • Place the CPU in a way so that it doesn't touch any other object ie. walls, tables or any other electrical equipments.
    • Perform maintenance tasks at a regular interval.
    • Clean up your PC properly. Or take help of an expert.

    Also read the following posts if necessary: 


    Stay with Marks PC Solution to get more interesting IT topics!


    Thứ Ba, 1 tháng 4, 2014

    Got my 1st Payment from Google AdSense!!

    0 nhận xét

    First Payment from AdSense through Wire Transfer


    To be honest, I'm really surprised. Just 20 days ago, I shared a success story - 2nd Payment from 360 Ads! In that post I mentioned, due to the transaction issue, my AdSense Payment is not coming to bank account. But only a few days ago, I got my Payout from Google AdSense


    Only a few months ago, Google introduced Bank Wire Transfer for Bangladeshis. And I selected this payment system immediately. Then Google sent $272 to my Bank Account. But the payment was rejected by Citi Bank NA Singapore due to compliance issue. And I got disappointed. 


    Then I've contacted AdSense team. They assured that, the problem will be solved soon. Days were passing but I found no luck. Again they sent payment of $438 on 21 February, 2014. And I was continuously checking my bank account. Few days later, AdSense Compliance Team informed me that they need some additional information to verify my account. I've provided the necessary information. 


    After checking my Bank Account for more than 10 times, I got bored. Finally the payment came to my account on 20 March, 2014. And it was automatically deposited into the account. So I didn't know the balance has been added silently! And that's the most interesting part. When I was continuously trying to get the payment, it didn't come. But when I give up the idea, it's come automatically. :) 


    If everything is okay, I will not suffer to collect my next payment. Since AdSense has resolved the compliance issue and verified my account. 


    Have a look at the Payment Receipt below: 

    Google AdSense Wire Transfer Receipt


    Payment Method: Bank Wire Transfer

    Payment was made through Bank Wire Transfer. And the service charge is really low. Google doesn't take any fee over the transfer. 


    Google sent me $ 438.90 = Tk. 34,142

    And I received $ 434.40 = Tk. 33674

    Transfer Fee $ 4.5 = Tk. 350 (I'm really confused! I thought it could be at least $30) 


    Next Plan

    My CPU is about to die - shuts down any time without notice! Sometimes it runs 3 days without problems. Sometimes it doesn't run for 3 minutes properly! And the most recent problem is Hard Disk Error. Windows 8 has detected a hard disk error. It warns to back up my files. I may lose all of data any time. 

    So I've decided to purchase a new system. My budget is $ 350. After purchasing the PC, hopefully I will discuss about PC configuration, hardware etc. 


    And as I'm earning continuously, my parents hardly get borded with my PC works. :) Now I've got more opportunites to enrich my site. And the visitors of Marks PC Solution will get more . . . 


    Stay with Marks PC Solution to get more interesting IT topics!