Thứ Sáu, 20 tháng 6, 2014

Type Multiple Lines in a Cell in Excel

0 nhận xét

How to Type Multiple Lines in a Single Cell in Excel


Excel users often face a common problem. Normally you can't type two or three words in a cell in Microsoft Excel. You have to merge cells to type something. But if you have no option to merge cell horizontally then you may fall in trouble. Believe it or not, last week I had the same problem while working in a worksheet! 


Today I am sharing the solution with you. Look at the image below - 


Multiple Lines in a Row


By default, you can't type like the image above in MS Excel. Have you noticed - I haven't merge the rows or colums. And there are 3 lines in Column A and 4 lines in Column B. Try to type multiple lines in a row or cell. Simply you can't. You have to use the Wrap Text option to type multiple lines in a cell. 


For Excel 2003

Sorry to say, I don't have Microsoft Office 2003. So I can't show you the path. Probably you have to follow this way- 

Format Menu > Font > Format Cells > Alignment > Text Control > Wrap Tex (Check the box) > OK. 

I'm not sure about this command. But the main point is - find the format cells window and then check the wrap text from alignment tab. 

You can also press Shift + Ctrl + F to open Fomat Cells dialogue box. 


For Excel 2007 and 2010

In Excel 2007 or 10, the process is almost same. But as you have to use the ribbon interface, you have to follow this way - 


Wrap Text Under Alignment in Home Tab


Go to the Home Tab > Click on the Marked area of Alignment > Now you will get Format Cells window (Shift + Ctrl + F) > Choose Alignment tab > Check the Wrap text option > Hit OK. 


Shortcut Method!

Maybe it's very time consuming for you. I'm gonna share a secret shortcut! 

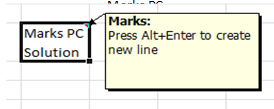
Type your text in cell, when the area ends, press Alt+Enter. You will get a new line in cell! See the image below: 


Multipe Lines in a Row


First I've typed Marks PC, then I pressed Alt+Enter and typed Solution. But remember, first you have adjust the column size. Adjust the column size and then type your text. Once you press Alt+Enter, new lines will be creating automaticlly when the cell area ends. 


There is another shortcut for you! Just look at the image below:


Wrap Text Icon in Home Tab

Have you noticed the market button? It's in the Alignment section, just below the Review Tab. This button is a shortcut to wrap text. Type your text and hit on this button to create multiple lines in a row/ cell. 


You can adjust the column size after typing the text. Your lines will be adjusted automatically. 


Stay with Marks PC Solution to get more interesting IT topics!


Thứ Năm, 29 tháng 5, 2014

How to Print PowerPoint Slides?

0 nhận xét


Printer Friendly Version of PowerPoint Slides


PowerPoint slides are usually very colorful. A presentation may include colorful backgrounds, charts, images etc. The slide maker always tries to make the slides attractive so that the audience concentrate to the presentation. Those slides though look amazing on a projector screen, may not be printer friendly at all! If you print a color slide normally, you can't read this well. 


Not many people need to print from Microsoft PowerPoint. Some of you may know the power point printing tips. But most guys copy the slides one by one and paste them to Microsoft Word! :) 


Today I'm gonna discuss about how to print PowerPoint slides as handouts. 


PowerPoint 2003

Open your presentation using Microsoft PowerPoint 2003. Now press Ctrl+P to open the Print Window. Look at the image below:


Print Options of PowerPoint 2003


Go to the Print What option and choose Handouts. In the color option, choose either Blank and White or Grayscale. Now go to the Handouts option > Slides per page > Choose 3, 4, 6 or 9 as your wish. 

Almost done! Choose your printer and hit on the OK button to print. 


PowerPoint 2010/ 2007

Office 2010 is the smartest version of Microsoft Office. I really like the print options of Office 2010. PowerPoint 2007 and 2010 is somewhat different but most of the options are almost same. 

To print handouts in Office 2010, open your presentation. Then press Ctrl + P to open the print window. Now look at the image below:


PowerPoint 2010 Print Options


From the Slides option, choose the number of slides. And from the Color option, choose Grayscale. Choose your printer and hit on the Print button to print. 


Note: If you would like to save your paper and ink, you can choose Outline instead of slides. Simply go to the Slides and choose outline. Check the preview. It it's okay then hit on the Print button. 


Important Keyboard Shortcuts
  • Press F5 to start the slide show
  • Press Shift+F5 to start the show from the current slide
  • Press Spacebar/ Enter to change the slides
  • Press Esc to end the show


Hope you've enjoyed the post. leave comment to share with us . . . 


Stay with Marks PC Solution to get more interesting IT topics!


Thứ Sáu, 25 tháng 4, 2014

Bliss - World's Most Viewed Photo!

0 nhận xét

Bliss - The Most Viewed Photo of the World


Windows users are certianly familiar with the default wallpaper of Windows XP - Bliss. In fact, most of the people are familiar with the Bliss wallpaper even not being a computer user! Over the last decade it's been the most viewed as well as famous photo of the world. You should know Microsoft has stopped providing technical support for Windows XP from April 08, 2014. And now it's time to say Goodbye to this popular operating system. 


Microsoft purchased this photo from Charles O'Rear who is a former National Geographic photographer. Microsoft team visited his house before saying goodbye to Windows XP. You can watch the interview in YouTube


The Story Behind Bliss Wallpaper

Bliss is the default desktop wallpaper of Microsoft Windows XP. It is an image of a rolling green hill and a blue sky with clouds. Only few people can recognize this picture as natural. Most of us think that it's graphically manipulated. But the photographer said - it was not! Have a look - 


The Default Wallpaper of Microsoft Windows XP


This photo was taken by Charles O'Rear, former National Geographic photographer, a resident of Napa Valley, in January, 1998. O'Rear was on his way to meet his Girl Friend Daphne Irwin (who he later married). He saw the hill free of vineyears. The grass was perfect green. There was bright sunshine with clouds in the blue sky. 


Charles O'Rear


O'Rear stopped somewhere near the Napa-Sonoma county line and set his Mamiya RZ67 Medium-Format camera on a stand. He chose Fuji film for its excellent quality. He took four pictures and later one of these was licensed by Microsoft. 


Mamiya RZ67 Medium-Format Camera


Charles also said that many photographer took the picture of same area of California. But he was really lucky. Because the light was great. The sky was little bit cloudy and green. The hillside was covered by green grass. But normally there is only grapevines. 


Bliss Location on World Map

This map is showing the approximate location where the Bliss image area is located. The exact position is 38.2489660 North and 122.410269West. 


8 years later, on November 27, 2006, Goldin+Senneby visited the site in Sonoma Valley where the Bliss image was taken. The same location was completely different. That place was full of vines. Have a look . . . 

Bliss Location in November 2006


Stay with Marks PC Solution to get more interesting IT topics!