Thứ Bảy, 28 tháng 6, 2014

How to Change the Folder Icon?

0 nhận xét


Use Custom Icon in Folder


By default, Windows folders look like a yellow folder. And if you use any custom theme, it may change. Many of you might know how to customize the Windows Folder Icon. It's very easy to change. Previously I discussed about how to change the pen drive/ hard drives icon. Today I'm gonna discuss about changing the folder icon. 


It's been few months when I published any Windows trick. Sorry for the long break!


To change the folder icon is much easier than changing the drive icon. If you wanna change the drive icon, you have to use an autorun file. But you don't need any notepad file to change the folder icon. All you need is just an icon format (must be .ico) image. 


First collect an icon format image. You can convert an image into icon in any of the following ways:

I prefer using IcoFx. Download it and convert your image into icon within seconds. After getting the icon, you can go for the next step.


Change Folder Icon
  1. Copy the icon that you wanna show in the folder. 
  2. Go to My Computer (Start + E) or any location where your desired folder is located. 
  3. Paste the icon within that folder.
  4. Press Backspace to get out of this folder. Now click right mouse button over the folder and go to the Customize tab > Change Icon as shown in the image below. 

Customize the Windows Folder


After hitting the Change icon button, you will get a list of Windows Icons. You can use any of them. But here I'm gonna use the custom icon. So you have to click on the browse button. 


Windows Default Icons

After hitting the browse button, you have to locate the folder again. Go to the folder and choose your custom icon that you've copied in the first step. Now hit on Open > Apply > OK. And you're done! 

Restart your PC if you don't see any change. 


Note: It's not necessary that the icon needs to be copied in your desired folder. Windows can show the folder icon from any other folder. But when you take that folder through a CD or Pen Drive, you may not get that icon with the folder. That's why I'm recommending to keep the custom icon within this folder. 


For more tips on Windows, visit this page . . .


Stay with Marks PC Solution to get more interesting IT topics!


Thứ Bảy, 21 tháng 6, 2014

How to Rotate Text in Excel

0 nhận xét

Text Rotation in MS Excel


When you're running out of space to write column headings in MS Excel, you can rotate  your texts. In my last post, I discussed how to wrap text to create multiple lines in a cell. But if you don't have sufficient option to create multiple lines, then you can rorate your text by some degrees. And definitely it will save your column space. 


Maybe most of you are familiar with text rotation. But I'm sharing this tips for the beginners. You will get the text rotation option at the same place where the wrap text is located. Both of them are located in the Alignment Tab in Format Cells dialogue box. 


Shortcut Method

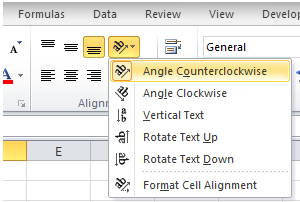
If you're using Excel 2007/ 2010, you can easily rotate text from ribbon. Go to the Home tab and then move to the Alignment section. Look at the image below:


Rotate Text by Mouse Click


First you have to select the cell which you wanna rotate. Then go to the text rotation icon and choose your desired rotation style. 


If you'd like to explore more options then press Shift+Ctrl+F > Go to the Alignment tab > Look at the Orientation option at the right of the window > Here you can rotate your text by degree. 

Alignment Tab in Format Cells Window


Text Alignment is really a useful tool in Excel. With this tool, you can reposition your text as your wish. In the ribbon, you can indent your text through text alignment section. You can position the text in the top, bottom, middle or left, right and center. 


You can also merge cells from text alignment section. And you just need to practice by yourself. Type text or numbers randomly. And try the each option by yourself. Within few days you will be an expert in formatting text in Excel!


Stay with Marks PC Solution to get more interesting IT topics!


Thứ Sáu, 20 tháng 6, 2014

Type Multiple Lines in a Cell in Excel

0 nhận xét

How to Type Multiple Lines in a Single Cell in Excel


Excel users often face a common problem. Normally you can't type two or three words in a cell in Microsoft Excel. You have to merge cells to type something. But if you have no option to merge cell horizontally then you may fall in trouble. Believe it or not, last week I had the same problem while working in a worksheet! 


Today I am sharing the solution with you. Look at the image below - 


Multiple Lines in a Row


By default, you can't type like the image above in MS Excel. Have you noticed - I haven't merge the rows or colums. And there are 3 lines in Column A and 4 lines in Column B. Try to type multiple lines in a row or cell. Simply you can't. You have to use the Wrap Text option to type multiple lines in a cell. 


For Excel 2003

Sorry to say, I don't have Microsoft Office 2003. So I can't show you the path. Probably you have to follow this way- 

Format Menu > Font > Format Cells > Alignment > Text Control > Wrap Tex (Check the box) > OK. 

I'm not sure about this command. But the main point is - find the format cells window and then check the wrap text from alignment tab. 

You can also press Shift + Ctrl + F to open Fomat Cells dialogue box. 


For Excel 2007 and 2010

In Excel 2007 or 10, the process is almost same. But as you have to use the ribbon interface, you have to follow this way - 


Wrap Text Under Alignment in Home Tab


Go to the Home Tab > Click on the Marked area of Alignment > Now you will get Format Cells window (Shift + Ctrl + F) > Choose Alignment tab > Check the Wrap text option > Hit OK. 


Shortcut Method!

Maybe it's very time consuming for you. I'm gonna share a secret shortcut! 

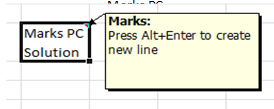
Type your text in cell, when the area ends, press Alt+Enter. You will get a new line in cell! See the image below: 


Multipe Lines in a Row


First I've typed Marks PC, then I pressed Alt+Enter and typed Solution. But remember, first you have adjust the column size. Adjust the column size and then type your text. Once you press Alt+Enter, new lines will be creating automaticlly when the cell area ends. 


There is another shortcut for you! Just look at the image below:


Wrap Text Icon in Home Tab

Have you noticed the market button? It's in the Alignment section, just below the Review Tab. This button is a shortcut to wrap text. Type your text and hit on this button to create multiple lines in a row/ cell. 


You can adjust the column size after typing the text. Your lines will be adjusted automatically. 


Stay with Marks PC Solution to get more interesting IT topics!


Thứ Bảy, 14 tháng 6, 2014

Change Photoshop Transparency Grid Color!!

0 nhận xét


If you're a Photoshop user, you must know about transparency grid. Transparency Grid is a checkerboard which appears when you're working with an image with transparent background. If your image has no color in the background, this checkerboard appears behind the image. 


Okay fine. Transparency will be indicated by the checkerboard. But you may ask, why I will change the color of transparency grid. In this post I'm gonna answer this question. And I will also show, how to change the color of the transparency grid. 


Why to Change? 

Suppose you've an image with white background. And you need to remove this background behind the image. You know there are different ways to remove background. I'm not gonna discuss it here. 

In the critical part of the image, Magic selection tool may not be able to select the white part. In that situation you can manually select the unselected portion. But you may also fail remove the white background properly. Because you can't select the white background as your default transparency grid is looks like a checkerboard that contains white color! So after saving the image you will notice there are some scattered white spots in the background. 

To get rid of this problem, you can change the default transparent grid. 


How to Change? 

Very simple. I'm using Photoshop CS5. Run Adobe Photoshop from your PC and follow the instruction - 

  1. Go to the Edit Menu.
  2. Select Preferences > Choose Transparency & Gamut.
  3. Now you will get the Preferences window with Transparency option selected.
  4. Keep the Grid size Medium or as your wish.
  5. Choose Dark from Grid Colors. Or you can customize the color using the custom option. You can also use any other color from the list if any of them is suitable for you. 
  6. Hit OK after choosing the Grid colors. 


Remember, the default grid color may need to changed when you're gonna remove any white background from your image. Or background that is light black. Otherwise you don't need to change it. 


Turning off the Grid!

You can totally turn off the grid! Yes! If you're bored with the grid that is shown for transparent layer, then you can turn off the grid from preferences window. 

Go to the Grid size as shown in the image above. And choose None. Now create a new document from your Photoshop with transparent layer. You will just see white background instead of a grid. But your image will have transparent layer. 


Stay with Marks PC Solution to get more interesting IT topics!


Thứ Ba, 10 tháng 6, 2014

Twist Image by Liquify Effect

0 nhận xét

Photoshop Liquify Effect


By default, Adobe Photoshop contains numerous attractive effects/ filters. And you can also add third party filters if you want. Today I will show the use of liquify filter which can be used to twist an image or object. And it's really a useful tool when you need to distort the photos of your friends! You can make their faces bizarre! :) 


I'm using Photoshop CS5 Extended Version. Hopefully the commands and options will be almost same with other versions of Photoshop. Let's start - 


  1. Run Photoshop and open an image from your hard disk. 
  2. Now go to the Filter Menu and choose Liquify (Shift+Ctrl+X).
  3. Now your image will be opened in a new window. 
  4. Mouse pointer will take the form of a plus sign with circle. 
  5. Hit and move the pointer over the image. 
  6. Rotate and twist the image as your wish. 
  7. If you're done press OK. Or if you wanna cancel, hit the Cancel button or press Esc. 

There are some additional options too! Look at the tools panel of liquify filter - 


Liquify Options

By default, you're getting the first tool selected. You can also try the other tools. They will produce a completely different result. 


You may need to adjust the brush size. Press and hold the right bracket ] to increase the brush size. And press and hold down the left bracket [ to decrease the brush size. 


Also try the Tool options from the right panel. Here you can change the Brush Size, Density, Pressure etc. Hit OK to save your changes to the image. Or press cancel if you don't like to distort the image. 

And don't forget to try the other commands of Filter menu. These are really cool! 


Hope you've enjoyed this post. If you have any query please leave a comment . . .


Stay with Marks PC Solution to get more interesting IT topics!


Thứ Năm, 29 tháng 5, 2014

How to Print PowerPoint Slides?

0 nhận xét


Printer Friendly Version of PowerPoint Slides


PowerPoint slides are usually very colorful. A presentation may include colorful backgrounds, charts, images etc. The slide maker always tries to make the slides attractive so that the audience concentrate to the presentation. Those slides though look amazing on a projector screen, may not be printer friendly at all! If you print a color slide normally, you can't read this well. 


Not many people need to print from Microsoft PowerPoint. Some of you may know the power point printing tips. But most guys copy the slides one by one and paste them to Microsoft Word! :) 


Today I'm gonna discuss about how to print PowerPoint slides as handouts. 


PowerPoint 2003

Open your presentation using Microsoft PowerPoint 2003. Now press Ctrl+P to open the Print Window. Look at the image below:


Print Options of PowerPoint 2003


Go to the Print What option and choose Handouts. In the color option, choose either Blank and White or Grayscale. Now go to the Handouts option > Slides per page > Choose 3, 4, 6 or 9 as your wish. 

Almost done! Choose your printer and hit on the OK button to print. 


PowerPoint 2010/ 2007

Office 2010 is the smartest version of Microsoft Office. I really like the print options of Office 2010. PowerPoint 2007 and 2010 is somewhat different but most of the options are almost same. 

To print handouts in Office 2010, open your presentation. Then press Ctrl + P to open the print window. Now look at the image below:


PowerPoint 2010 Print Options


From the Slides option, choose the number of slides. And from the Color option, choose Grayscale. Choose your printer and hit on the Print button to print. 


Note: If you would like to save your paper and ink, you can choose Outline instead of slides. Simply go to the Slides and choose outline. Check the preview. It it's okay then hit on the Print button. 


Important Keyboard Shortcuts
  • Press F5 to start the slide show
  • Press Shift+F5 to start the show from the current slide
  • Press Spacebar/ Enter to change the slides
  • Press Esc to end the show


Hope you've enjoyed the post. leave comment to share with us . . . 


Stay with Marks PC Solution to get more interesting IT topics!


Thứ Ba, 13 tháng 5, 2014

Working with Photoshop Stroke

0 nhận xét

How to Apply Stroke in Photoshop


Photoshop Stroke belongs to layer style. You can add stroke outside of an image, text or shape. When you apply stroke over something, it looks like a border or outline. You can also choose different colors for stroke. And you can also adjust the size, position and opacity while applying stroke. 


Last month I wrote about how to work with Fill & Opacity in Photoshop. I think you should also have a look to this tutorial. It will be helpful for you. 


Photoshop Stroke

Look at the two images below side by side. The left one has no outline. But the right one has a border outside of it. 

Photoshop Stroke Effect


No stroke has been applied on the left image. And the right image has a stroke outside of it. You can also use stroke with texts and shapes. Stroke can highlight something. Sometimes after applying stroke over something, you can minimize the fill. In that time, you will get stroke highlighted and the inside dimmed! Learn more . . . 


How to Apply Stroke?

If you wanna apply stroke over an image then open it. Or create a new document and then type something or take any shape on which you wanna apply stroke. Now make sure you're on the right layer I mean your image or text is selected. Also make sure that your Layer window is turned on. Now go to the strong as shown in the image below. 


Strok Option in Adobe Photoshop CS5


Hit on the fx (Add a layer style) at the end of layer panel and choose Stroke. Now you will get the Layer Style window. Look at the Stroke options below:


Stroke in Layer Style Window


Adjust the size and look at the effect of your stroke outside the image or text. This is very important. Sometimes 1 px doesn't make any sense. Though it depends on the situation I prefer 2 or 3 px. Certainly a fat stroke will not make any sense. 


Keep Position - Outside, Blend Mode - Normal, Fill Type - Color and Opacity - as your wish. If you minimize the opacity from 100% to 60 or 70%, then your stroke color will be darken somewhat. 


And finally choose a brilliant color for the stroke. Hit on the color box and select different colors to test the result. After choosing the color, hit on the OK button. 


You can also explore some additional options from Layer Style window. Suppose Drop Shadow, Gradient Overlay, Satin, Bevel and Emboss these are really cool options here. These can turn your normal image into an outstanding one. And these are really awesome for creating superb text! 


After applying stroke, also adjust the Fill and Opacity of the layer. These control the transparency of your image. Adjusting the transparency will give you a completely different look. 


Stay with Marks PC Solution to get more interesting IT topics!


Thứ Bảy, 10 tháng 5, 2014

Delete All Emails from Yahoo Inbox!!

0 nhận xét

How to Delete All Emails from Yahoo


By the grace of Facebook, your inbox is getting fat everyday. If your Yahoo Inbox are filled with thousand of unnecessary messages, then it could be difficult for you to find the important mails. Gmail users can easily delete all emails from inbox because it has option to select all messages at the same time. 


Like Gmail, Yahoo has also the Select All option. But the Select All option of Yahoo can't select the whole inbox. It is capable of selecting the loaded messages only. It could be 50, 100, 200 or how much messages you've loaded at a time. If you wanna delete a large volume of messages from Yahoo inbox, then you have to be little bit tricky! 

Today, I'm gonna discuss how to quickly delete all messages from Yahoo Mail inbox. 


Before you start - 

Make sure you're using the latest version of your browser and latest interface of Yahoo Mail. Firefox or Internet Explorer is optimized for Yahoo Mail. Chrome users could get a message to change the browser. And definitely you need a better net connection while running this task.


Deleting All Messages of Yahoo Inbox

  • Sign in to Yahoo and open your Yahoo Mail Inbox. Never press Esc. Let the mailbox load completely. 
  • By default, 50 messages will be loaded at a time. 
  • If you scroll down, another 50 messages will be loaded. Thus continue scrolling to the bottom. 
  • If you get bored then delete the already loaded messages. Hit on the Select All button and press the Delete key.

Select & Delete All Messages from Yahoo Mail

  • After pressing the Delete button, you will get the following notificaiton.

Delete All Messages Notification

  • Hit OK to delete all the selected messages. 

If you just continue scrolling down for 2/3 minutes, I believe you will be able to delete more than 5000 emails at the same time. 


Thus if your inbox has more than 10000 emails, I don't think you need more than 7/8 minutes to delete them. :) 


Now look at my inbox below - 


Blank Inbox of Yahoo Mail


My inbox is blank. And there are more than 2000 mails in my Trash box. And it took a very short time to delete all messages from the Yahoo inbox by using the above method! 


Stay with Marks PC Solution to get more interesting IT topics!


Thứ Sáu, 9 tháng 5, 2014

How to Create Bootable Windows Disk?

0 nhận xét


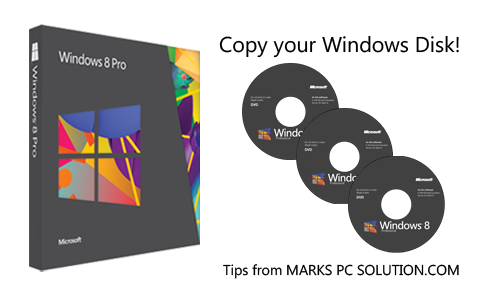
Copy Windows Disk


Hello Windows lovers? How are you? Today I am gonna share how to copy a bootable Windows disk I mean how to back up a Windows CD/ DVD disk. Suppose you purchased a Windows from Microsoft costing $200 and it doesn't work anymore after installing Windows for few times. Is it fair? Not at all - let's punish Microsoft!!


Necessary Tools
  • Windows Installation CD/ DVD (Maybe Windows 8, 7 or XP)
  • Blank Recordable CD/ DVD as per your requirement (CD for Windows XP Only)
  • At least one DVD Writer (Or two if available)
  • Burning Software like Nero or Infra Recorder (I'm gonna use Infra)
  • And of course a PC user with sufficient operating knowledge! 

And you should know, if you simply copy a Windows disk and burn it to another blank disk, then you will get something on that disk. But it will not be usable. Even if you're able to start installing Windows from running condition, it will be stopped installing after reboot. That means your disk will not be bootable. And you will not be able to set up Windows from a non bootable disk. So you have to create a data disk which will be bootable. Hope you got my point. 


Here, for the purpose of this tutorial, I'm gonna use Windows 8 Pro and Infra Recorder as burning software. So I will use the word Windows 8 and Infra Recorder evrywhere. But it applies for other versions of Windows too. 

You can also use Nero. But always remember, whatever you do, you have to create a data disk.


Let's Start
  • Insert your Windows 8 Disk into the DVD Drive
  • Now run Infra Recorder (Please download if you don't have it. It's free)
  • Go to the Menu bar > Actions > Copy Disk > To a Disk Image . . . 

Copy Data Disk


Now you will get another window as below - 

Copy Image File


Preparing the ISO File

Now select your source file I mean the Windows 8 Disk location. Normally it detects your drive automatically. Now manually choose the destination of your Windows Image file (ISO file), name it as Windows 8.iso and hit OK. Now copying will be started. Wait for the task to be finished. It may take few minutes. After completing the task, Windows disk will be ejected automatically. And you will get an iso image of your Windows.


Now insert a blank DVD in the drive. The size of a single layer DVD is usually 4.7 GB. Try to use a good disk. Otherwise it will not be durable. 


Burning the Image to Blank DVD

Go to the Infra Recorder again and choose Burn Image from Actions menu. Locate Windows 8.iso from your hard disk and open it. Choose the drive which contains blank DVD and hit OK. And the burning process will be started immediately. 


You can also burn through Windows 8. No third party software is needed. If you have previously saved copy of a Windows iso image then you don't need Nero or Infra Recorder. Simply click right mouse button over the Windows.iso file and choose Burn Disk Image. Choose your DVD drive and start burning! 


Windows Built in Burner


Caution

  • Make sure that your master disk is okay and free of scratches. 
  • Use quality blank disk. 
  • Before inserting the disk to the drive, gently clean it with a soft tissue paper. 
  • Any interruption in the power supply during this operation is not acceptable. 

If you face any problem, please inform me. 


Stay with Marks PC Solution to get more interesting IT topics!


Thứ Tư, 7 tháng 5, 2014

Create Imaginary Profiles by Fake Name Generator!

0 nhận xét


Fake Profile Generator


Today I'm gonna share a funny site with you - Fake Name Generator! Maybe you've already get an idea about the site from its name. But it doesn't create name only. It creates a complete profile which you may consider either fake or imaginary. This site is capable of creating profiles based on countries, gender, age etc. 


To generate a fake/ imaginary profile, visit the above site. Immediately after visiting the site, you will get a profile ready. If this works for you, then you don't need to create any other profile. Or you can customize settings as below: 


Fake Name Generator Options


Select Gender, Name Set and Country. Press the Generate button and see the magic! If you need more customization then hit on the Advanced Options. After generating a profile, you will get lots of information. Such as - 
  • Name
  • Address
  • Phone
  • E-mail
  • Username
  • Password
  • Birthday
  • Blood Group
  • Favourite Colour
  • Website
  • Company
  • . . . . . . . . .

Even you don't need to enter so many information in any web form. 


This site is fast, safe and free. It's easy to use. No sign up is required. But you can sign in through your Google+ profile if necessary. If you sign in here, you will be able to save your fake profiles for future use! 


When and How to Use?

Active net users know well how to use fake profiles. Usually when you need to create an ID hiding your personal or real information, you can use this name generator. Sometimes you may need to create foreign profile and you may not have sufficient information. In that time you can take help of this site. 

But never abuse this amazing tool! 


Order Bulk Identities!

Suppose you need thousands of fake identities. You can order random names for free!!! Follow the link, select your options properly, enter the value in Quantity box, type captcha and then place your free order. Within few minutes you will get your product. 

Note: Choose your fields properly. You can exclude some unnecessary fields. 


Stay with Marks PC Solution to get more interesting IT topics!


Thứ Năm, 1 tháng 5, 2014

Google Countdown Timer

0 nhận xét

Google Alarm Clock


Couple of weeks ago I shared Cook Timer with you. And you can use this timer as alarm clock. But do you know Google has a nice timer for you?! If you are familiar with the special search techniques of Google you should not be surprised. But your friends will be really amazed when they will see that you are using an alarm clock in Google homepage!


Okay let's see how to do. First, go to Google. Now type any of the following queries as your wish - 
  • Google Timer
  • Timer
  • Count Down Timer
  • Countdown Timer
I suggest you to use only Google Timer. Type Google Timer and hit enter. You will get the following timer in search result - 


Google Countdown Timer


The default option is 5 Minutes 0 Second. Simply press the start button to launch the timer. After 5 minutes, it will be ringing. 


To change the alarm time, click on it. It will look like as - 


00h  00m  00s


You will get cursor there. You have to start with the Second (s) option. Type your seconds. If there is no second, then type 00. 

Press left arrow key to move to the Minute option. If you need to set 3 minutes then type 3. By the say method, you can set hour. 


Remember, you can't go directly to the Minute or Hour option. You have to go step by step. Even if Minute and Second is 0, you have to enter 00 there. 


Features of the Timer
  • After starting the timer, you will see a progress bar. 
  • You can use the stop button to pause and reset button to start the timer from beginning. 
  • By mistake, if you close the Tab with timer running, you will get a message. 
  • This timer works in offline too. Suppose you've started the timer when you were online. But if your net gets disconnected, it will be working. But you must keep your browser running. 


Stay with Marks PC Solution to get more interesting IT topics!