Thứ Sáu, 20 tháng 6, 2014

Type Multiple Lines in a Cell in Excel

0 nhận xét

How to Type Multiple Lines in a Single Cell in Excel


Excel users often face a common problem. Normally you can't type two or three words in a cell in Microsoft Excel. You have to merge cells to type something. But if you have no option to merge cell horizontally then you may fall in trouble. Believe it or not, last week I had the same problem while working in a worksheet! 


Today I am sharing the solution with you. Look at the image below - 


Multiple Lines in a Row


By default, you can't type like the image above in MS Excel. Have you noticed - I haven't merge the rows or colums. And there are 3 lines in Column A and 4 lines in Column B. Try to type multiple lines in a row or cell. Simply you can't. You have to use the Wrap Text option to type multiple lines in a cell. 


For Excel 2003

Sorry to say, I don't have Microsoft Office 2003. So I can't show you the path. Probably you have to follow this way- 

Format Menu > Font > Format Cells > Alignment > Text Control > Wrap Tex (Check the box) > OK. 

I'm not sure about this command. But the main point is - find the format cells window and then check the wrap text from alignment tab. 

You can also press Shift + Ctrl + F to open Fomat Cells dialogue box. 


For Excel 2007 and 2010

In Excel 2007 or 10, the process is almost same. But as you have to use the ribbon interface, you have to follow this way - 


Wrap Text Under Alignment in Home Tab


Go to the Home Tab > Click on the Marked area of Alignment > Now you will get Format Cells window (Shift + Ctrl + F) > Choose Alignment tab > Check the Wrap text option > Hit OK. 


Shortcut Method!

Maybe it's very time consuming for you. I'm gonna share a secret shortcut! 

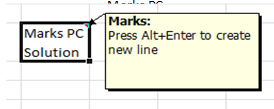
Type your text in cell, when the area ends, press Alt+Enter. You will get a new line in cell! See the image below: 


Multipe Lines in a Row


First I've typed Marks PC, then I pressed Alt+Enter and typed Solution. But remember, first you have adjust the column size. Adjust the column size and then type your text. Once you press Alt+Enter, new lines will be creating automaticlly when the cell area ends. 


There is another shortcut for you! Just look at the image below:


Wrap Text Icon in Home Tab

Have you noticed the market button? It's in the Alignment section, just below the Review Tab. This button is a shortcut to wrap text. Type your text and hit on this button to create multiple lines in a row/ cell. 


You can adjust the column size after typing the text. Your lines will be adjusted automatically. 


Stay with Marks PC Solution to get more interesting IT topics!


Thứ Năm, 29 tháng 5, 2014

How to Print PowerPoint Slides?

0 nhận xét


Printer Friendly Version of PowerPoint Slides


PowerPoint slides are usually very colorful. A presentation may include colorful backgrounds, charts, images etc. The slide maker always tries to make the slides attractive so that the audience concentrate to the presentation. Those slides though look amazing on a projector screen, may not be printer friendly at all! If you print a color slide normally, you can't read this well. 


Not many people need to print from Microsoft PowerPoint. Some of you may know the power point printing tips. But most guys copy the slides one by one and paste them to Microsoft Word! :) 


Today I'm gonna discuss about how to print PowerPoint slides as handouts. 


PowerPoint 2003

Open your presentation using Microsoft PowerPoint 2003. Now press Ctrl+P to open the Print Window. Look at the image below:


Print Options of PowerPoint 2003


Go to the Print What option and choose Handouts. In the color option, choose either Blank and White or Grayscale. Now go to the Handouts option > Slides per page > Choose 3, 4, 6 or 9 as your wish. 

Almost done! Choose your printer and hit on the OK button to print. 


PowerPoint 2010/ 2007

Office 2010 is the smartest version of Microsoft Office. I really like the print options of Office 2010. PowerPoint 2007 and 2010 is somewhat different but most of the options are almost same. 

To print handouts in Office 2010, open your presentation. Then press Ctrl + P to open the print window. Now look at the image below:


PowerPoint 2010 Print Options


From the Slides option, choose the number of slides. And from the Color option, choose Grayscale. Choose your printer and hit on the Print button to print. 


Note: If you would like to save your paper and ink, you can choose Outline instead of slides. Simply go to the Slides and choose outline. Check the preview. It it's okay then hit on the Print button. 


Important Keyboard Shortcuts
  • Press F5 to start the slide show
  • Press Shift+F5 to start the show from the current slide
  • Press Spacebar/ Enter to change the slides
  • Press Esc to end the show


Hope you've enjoyed the post. leave comment to share with us . . . 


Stay with Marks PC Solution to get more interesting IT topics!


Thứ Bảy, 10 tháng 5, 2014

Delete All Emails from Yahoo Inbox!!

0 nhận xét

How to Delete All Emails from Yahoo


By the grace of Facebook, your inbox is getting fat everyday. If your Yahoo Inbox are filled with thousand of unnecessary messages, then it could be difficult for you to find the important mails. Gmail users can easily delete all emails from inbox because it has option to select all messages at the same time. 


Like Gmail, Yahoo has also the Select All option. But the Select All option of Yahoo can't select the whole inbox. It is capable of selecting the loaded messages only. It could be 50, 100, 200 or how much messages you've loaded at a time. If you wanna delete a large volume of messages from Yahoo inbox, then you have to be little bit tricky! 

Today, I'm gonna discuss how to quickly delete all messages from Yahoo Mail inbox. 


Before you start - 

Make sure you're using the latest version of your browser and latest interface of Yahoo Mail. Firefox or Internet Explorer is optimized for Yahoo Mail. Chrome users could get a message to change the browser. And definitely you need a better net connection while running this task.


Deleting All Messages of Yahoo Inbox

  • Sign in to Yahoo and open your Yahoo Mail Inbox. Never press Esc. Let the mailbox load completely. 
  • By default, 50 messages will be loaded at a time. 
  • If you scroll down, another 50 messages will be loaded. Thus continue scrolling to the bottom. 
  • If you get bored then delete the already loaded messages. Hit on the Select All button and press the Delete key.

Select & Delete All Messages from Yahoo Mail

  • After pressing the Delete button, you will get the following notificaiton.

Delete All Messages Notification

  • Hit OK to delete all the selected messages. 

If you just continue scrolling down for 2/3 minutes, I believe you will be able to delete more than 5000 emails at the same time. 


Thus if your inbox has more than 10000 emails, I don't think you need more than 7/8 minutes to delete them. :) 


Now look at my inbox below - 


Blank Inbox of Yahoo Mail


My inbox is blank. And there are more than 2000 mails in my Trash box. And it took a very short time to delete all messages from the Yahoo inbox by using the above method! 


Stay with Marks PC Solution to get more interesting IT topics!


Thứ Bảy, 26 tháng 4, 2014

How to Sign out of Gmail Remotely?

0 nhận xét

How to Sign out of Gmail account from a remote location

Your email account is as important as your cell phone. Even sometimes it's more important than a cell phone. Because it may contain lots of personal as well as official information. Once hacked, it could be really tough to get back. So, you should keep your email ID safe and secured. Today I'm gonna discuss about how to sign out of Gmail from a remote location. 


Background Story


When I was in college, during my graduation, I used to sign in to my Gmail account from Computer Lab. And I used to select the Remember me option for quick login. One day, when I was working in my Gmail inbox, the electric supply interrupted. And I didn't have enough time to wait. So, I had to leave my account signed in to that browser. 


I was not sure whether the next user would get my account signed in or not. I was lucky that I didn't save my password. Otherwise anyone could see the saved password and access my account. 


However, there was nothing to worry about! Because Gmail has a great way to sign out of all other sessions except the current one. And you can also change your password any time. 


You may need to sign in to your Gmail account from different locations. Suppose your friend's PC, cybercafe, library, cell phones or any other public places. By mistake, if you forget to sign out, your account might be unsafe. Or if you lost your cell phone with Gmail account signed in, then what? Simply sign out of all other sessions from your Gmail inbox. 


Account Activity

If you need to sign out of all other sessions, then you have to go to the Account Activity options from your inbox. Account activity is available at the bottom of your inbox. If you're using basic HTML view then you will get the account activity as below:


Last Account Activity in Gmail

Look at the red mark. Last account activity. And look at the yellow shade - Detials. Hit on the details button to view your activities. And if you're using the standard view of Gmail then it looks like as below -

Last Account Activity in Gmail

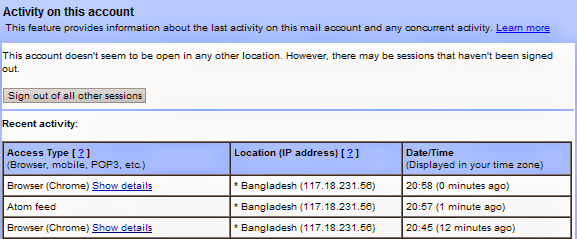
And this will be located at the bttom right corner of your inbox. After hitting the Details option, you will be redirected to a new page named Activity on this Account. Look at the image below:


Gmail Account Activity


Since my account is not open anywhere, it shows - This account doesn't seem to be open in any other location. If there is any unusual login detected, it would show different message. 

Now look at the button - Sign out of all other sessions. If you hit on this button, your account will be automatically signed out from any devices/ sessions except the current one. If you're signed in into your mobile, it will also be signed out. 

Also look at the Recent activity table. It shows from where your account has been accessed, with location, IP address, date/time and duration.  


Hopefull this will be really helpful for you to keep your Gmail account safe. Facebook has also  similar option. You will get it from settings. 


Stay with Marks PC Solution to get more interesting IT topics!


Chủ Nhật, 6 tháng 4, 2014

Troubleshoot Program Compatibility in Windows 8

0 nhận xét

Troubleshoot Incompatible Programs in Windows 8


Just from the beginning, Windows 8 got a lot of problems to be solved! You know I've discussed about .Net Framework 3.5 , My Computer Icon, Windows 8 Tiles, Activation Procedure etc. And I've also discussed about new features of Windows 8, it's advantages and disadvantages. But somehow, I've skipped the program compatibility issue. Though it's too late to write about, but in this post I would like to discuss about program compatibility troubleshooting. 


Actually, Program Compatibility is not a new term at all. Perhaps it starts when Windows Vista came in the market. In that time, programs made for Windows XP or 98 wouldn't work fine with the new version of Windows. And the same problem is still being faced by the users of Windows 7 or 8. 


Well I don't like to use the term Windows 7 here. I will just use Windows 8 in this tutorial. And hopefully this will be also helpful for Windows 7 users to troubleshoot program compatibility. 


Background Story:

Few years ago, when I've installed Windows 8 for the first time on my PC, simply I got puzzled. In every point, there was a problem. One of them was program compatibility. A program that worked fine with XP or 7, didn't run on Windows 8! But I hardly wanted to back to the older version of Windows. 

Let me show you an example - 

I was in trouble while opening Adobe Photoshop CS5 (Portable). I got a message - Incompatible Program. 

And I solved the problem using troubleshooting option. 


Troubleshoot Compatibility:

When you can't run or open an incompatible program in Windows 8, follow the steps below:


Compatibility Troubleshooting option at the right click

  1. Click right mouse button over that program (Should be .exe file). 
  2. Choose Troubleshoot Compatibility.
  3. Select Troubleshoot Program.
  4. Now mark the problem(s). 
  5. I usually choose - The program worked in earlier versions . . .
  6. Now select an OS on which the program works fine and press Next.
  7. Test the Program and press Next.
  8. If it runs properly, Save the settings and close the window.

Compatibility Mode:

Another way to make programs compatible is using the Compatibility Mode. Look at the image below:


Program Compatibility Mode in Windows 8

This option allows you to run a program in compatible with a particular OS. Follow the steps below: 
  1. Right click on the program and choose Properties.
  2. Move to the Compatibility tab.
  3. Go to the Compatibility Mode.
  4. Mark the option - Run this program in compatibility mode . . . 
  5. Now select an OS in which you ran the program earlier.
  6. You can also change the screen and color mode if you need. 
  7. Choose Run as Administrator if necessary.
  8. Hit Ok. 

Program Compatibility Troubleshooter

The previous two methods are manual. But you can also use the automatic detection system. This troubleshooter will find the incompatible program in your PC. 


List of Programs in Compatibility Troubleshooter

  1. Press Start and Type Program Compatibility.
  2. Choose Settings and hit on Run programs made for previous versions of Windows.
  3. Troubleshooter will open. Press Next.
  4. Now you will have a list of the programs. Choose one that gives you trouble. 
  5. Press Next > Troubleshoot Program > Choose an option > Press Next > Select your OS > Test the Program > Next > Save the Settings > Close the Window.
Note: Steps could be slightly different depending on the program types.


Remember, you can run the troubleshooter as Administrator. You can also apply automatic repairs. Just after running the troubleshooter, hit on the Advanced button to get these options. 

Stay with Marks PC Solution to get more interesting IT topics!