Chủ Nhật, 6 tháng 7, 2014

Photoshop Typing Techniques

0 nhận xét

Photoshop Typing Tutorial


The general thinking about Photoshop is it's a photo and image editing tool. The notion is not wrong at all. But Photoshop also allows you to work with text. Believe it or not, Photoshop has some extraordinary options which are not available even in Microsoft Word! Today I'm gonna share some tips on Photoshop Typing


Type Tool (T)

If you're familiar with the Photoshop Interface, you should know about type tool. It's found in the tools panel and it looks like T. Look at the image below:


Adobe Photoshop Type Tools


Here you can see the type tool along with its four variations. But the first one, I mean  Horizontal Type Tool is the mostly used option here. And you can use Vertical Type Tool when the text needs to be typed vertically. 

You can also see Type Mask Tool. When you type something normally, the text appears in a new layer. But if you type something using the type mask tool, the text will appear in the background layer. It prevents the text to create a new layer! 


Using the Type Tool

To start typing in Photoshop, first you have to create a new document. Now press T to enable the type tool or you can simply hit the type tool icon through mouse. 

Now your mouse pointer will take the shape of an I beam. Hit on the any part of your document and you will get a cursor. Start typing! 


Photoshop Text Formatting Options


Just below the Menu bar, you will get the text formatting options. Here you can change font, font style, font size, text alignment etc. And look at the marked icon at the right - T with a Curve below. It's the wrap text option. Just select your text and hit on this button. Choose different styles and see the magic! 

Note: Type tool must be selected to get the formatting bar below the Menus. Or you will not get this bar. 


Type as Text Box

Word users know well about text box. Type tool can also be used as text box. After choosing the Type tool, press and hold down the mouse pointer in the document and then drag it. You will get a bounding box with cursor. Now you can type within this box. 


Photoshop Text Box

Now you can format the above text easily. Choose Move Tool (V) to move the text. Press Ctrl+T to get the bounding box back, and you can increase or decrease the text size just by dragging the corner. You can also rotate the whole text through rotation dragging it from any corner. 

If you wanna edit the text, simply press T, and you will get the cursor back. After editing the text, you can simply press the move tool to commit changes. Or you can hit on the Tick Mark   (Commit any current change) to make changes. If you wanna cancel then hit on the cancel button. (These two options will be available just below the cross button at the upper right corner)


Choosing the Color

To choose a desired color for your text, you have to use the color picker from the toolbar. You will get the color picker at the bottom of the left toolbar. 

First, select your text > Hit on the Color picker > Select a color area you want > Hit OK.

Or you can simply select the text layer > choose color from Color Picker > Hit OK > Now press Alt+Del key to change the color. 


Working with Paragraph and Character Panel

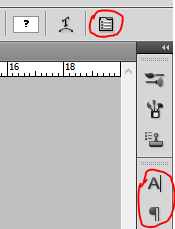
These two options will give you more options to format your text. You can enable character and paragraph options from shortcut icons as shown below - 


Toggle Between Character and Paragraph


The shortcuts for these options are marked here. But if your interface is missing of these icons anyhow, you can directly go to the Window menu. Then choose Character or Paragraph   which you need. 


Paragrapch and Character Window

Select your text and try the each option of the character by yourself. There are some great options for your text like - Vertical Scale, Horizontal Scale, Subscript, Superscript etc. Just try each button one by one. 

You can also try the options of Paragraph window. It's a great tool to adjust your text and fix the text alignment. 


Wrap Text


It's somewhat like Word Art option of Microsoft Word. But of the effects of wrap text are not available in Word Art. Look at the Wrap Text option in Photoshop Formatting bar - 


Photoshop Wrap Text Icon

First you have to select your text. Then click on the above icon to get Wrap Text window. Now you can try each option. 


Photoshop Wrap Text

Choose the effects from the Style. Then adjust bend, horizontal distortion and vertical distortion to get a more customized look. Hit OK when you're done. 


Hope this post will guide you when typing in Photoshop. If you face any problem, please knock me . . . 


Note: All options and images of this post are compatible with Adobe Photoshop CS5. Older versions of Photoshop may slightly vary. 


Stay with Marks PC Solution to get more interesting IT topics!


Thứ Ba, 1 tháng 7, 2014

How to Put WordPress Site Offline?

0 nhận xét

How to Make WordPress Blog Private


WordPress Visibility option allows you to control who can visit your site, whether search engines will index it or not etc. In my last post, I discussed how to put blogger site offline. And in this post I'm gonna talk about WordPress. 


In my previous post, I discussed the reasons behind putting a site offline. Here I would like to repeat those reasons -

  • If your site is new, you can discourage search engines to index your site. Because a new site with insufficient content will not get a good rank.
  • If your site is private or subject to premium membership, you can disallow general people to view your contents.
  • Due to political violations or religious issues, if your social security is under threat, you can temporarily make your site unavailable instead of deleting it. 

WordPress Settings Option

Site Visibility Options
  1. Login to your WordPress site and go to Admin Panel.                                                         (ie. https://munnamark.wordpress.com/wp-admin)
  2. Go to Settings from the left pane and choose Reading. (As shown in the above image) (ie.https://munnamark.wordpress.com/wp-admin/options-reading.php)
  3. Now you will get the Reading Settings page.
  4. Move to the Site Visibility section. There you will get three choices. 
  5. The first choice is the default option. It allows search engines to index your site.
  6. The second choice forbid search engines to index your site.
  7. And the third option makes your site private. That means only invited persons will be able to access your site.
  8. Choose any of the three options that is suitable for you.

Site Visibility Option in WordPress


Note: You can change the settings at any time.


Adding Users in a Private Site

If you make your site private, then you have to manually invite members to your site. Only invited members is capable of viewing your contents or writing posts in your site. To invite users, follow the steps below:


WordPress Users Option

  1. Go to your WordPress control Panel
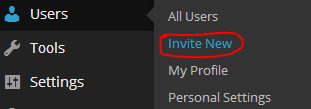
  2. Choose Users > Invite New (As shown in the above image)                                         (ie. yoursite/wp-admin/users.php?page=wpcom-invite-users)
  3. Now you will get the invite users form. Type username or their emails. Choose one of the five roles (Contributor/ Author/ Editor/ Administrator/ Follower) for the invited members. 
  4. Type an invitation message if necessary
  5. Finally hit on the Send Invitation button.

How to Invite New Users in WordPress


Then the invited user will get an email. If he accepts the invitation, you can view the member in the past invitation section. From there you can manage your members. 


Hope you've clearly understand the topic. If you have any confusion, don't hesitate to leave a comment. :)


Get more tips on Blogging . . . 


Stay with Marks PC Solution to get more interesting IT topics!


How to Put Blogger Site Offline?

0 nhận xét
Access Denied to Blogger Blog


Both Blogger and WordPress have an option to put the site offline or make it unavailable permanently or temporarily. You may need to put your site offline for a number of reasons. In this post, I will just talk about how to limit access to a blogger site. At the same time, you can deny the search engines to access your site and you can also restrict general people to view your contents. 


As mentioned earlier, there could be several reasons behind putting the site offline. Such as - 

  • You can restrict search engines to crawl your site. Because you would like to decorate your site first. In that case you can limit search engines' access. 
  • You may need to make your site unavailable temporarily due to political violations or religious issues. 
  • Or may be the site could be a private one. Maybe it's subject to be unavailable to the public. 

Whatever the reason, or even if you don't need to put your site offline, at least you should know the way. Some bloggers even think, why I put my site offline? When I'm trying to cirulate the site as much as possible? I've already mentioned the reasons! :)


Restrict Search Engines Crawl your Site

You can limit search engines' access to index your site if necessary. Follow the steps below - 

  1. Go to Blogger Control Panel/ Settings/ Dashboard.
  2. Choose Settings from the left pane.
  3. Select Basic > Basic > Privacy.
  4. Choose No for both options as below.
  5. Hit on the Save Changes button. 

 Privacy Option in Blogger Blog


The first No doesn't matter much. But the second No matters! If you choose No in the second option, your site will not be crawled by search engines. But everyone will be able to access your site.


Restrict Public Access to your Contents

If your site is private and you don't want people view your contents, then you can absolutely restrict public access. Follow the steps below - 

  1. Go to Blogger Control Panel > Settings.
  2. Choose Basic under the Settings option.
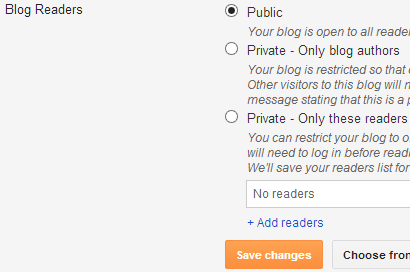
  3. Find the Blog Readers option under Permissions section.
  4. Here you have three choices: Public, Private (Blog Authors), Private (Selected Persons).
  5. If you choose the second option, only blog authors will be able to access the site. Other people will just get a message - This is a private blog
  6. If you would like to add some readers, then choose the third option. Then add readers from your contact list or you can type their emails. Whenever they try to access your site, they have to log in. 
  7. Finally, hit on the Save Changes button. 

Blog Readers Permission in Blogger Site


Tips!

If your site is totally new, then you can use the Privacy option only. You can stop search engine crawl your site. Because search engines will not find enough contents in a new site. That's why it's better to write first. Then you may let search engines to index your site. But you can keep your site Public. 


Later I will discuss the same thing for WordPress site. 


Get more tips on Blogging . . . 

Stay with Marks PC Solution to get more interesting IT topics!


Thứ Bảy, 28 tháng 6, 2014

How to Change the Folder Icon?

0 nhận xét


Use Custom Icon in Folder


By default, Windows folders look like a yellow folder. And if you use any custom theme, it may change. Many of you might know how to customize the Windows Folder Icon. It's very easy to change. Previously I discussed about how to change the pen drive/ hard drives icon. Today I'm gonna discuss about changing the folder icon. 


It's been few months when I published any Windows trick. Sorry for the long break!


To change the folder icon is much easier than changing the drive icon. If you wanna change the drive icon, you have to use an autorun file. But you don't need any notepad file to change the folder icon. All you need is just an icon format (must be .ico) image. 


First collect an icon format image. You can convert an image into icon in any of the following ways:

I prefer using IcoFx. Download it and convert your image into icon within seconds. After getting the icon, you can go for the next step.


Change Folder Icon
  1. Copy the icon that you wanna show in the folder. 
  2. Go to My Computer (Start + E) or any location where your desired folder is located. 
  3. Paste the icon within that folder.
  4. Press Backspace to get out of this folder. Now click right mouse button over the folder and go to the Customize tab > Change Icon as shown in the image below. 

Customize the Windows Folder


After hitting the Change icon button, you will get a list of Windows Icons. You can use any of them. But here I'm gonna use the custom icon. So you have to click on the browse button. 


Windows Default Icons

After hitting the browse button, you have to locate the folder again. Go to the folder and choose your custom icon that you've copied in the first step. Now hit on Open > Apply > OK. And you're done! 

Restart your PC if you don't see any change. 


Note: It's not necessary that the icon needs to be copied in your desired folder. Windows can show the folder icon from any other folder. But when you take that folder through a CD or Pen Drive, you may not get that icon with the folder. That's why I'm recommending to keep the custom icon within this folder. 


For more tips on Windows, visit this page . . .


Stay with Marks PC Solution to get more interesting IT topics!


Thứ Bảy, 21 tháng 6, 2014

How to Rotate Text in Excel

0 nhận xét

Text Rotation in MS Excel


When you're running out of space to write column headings in MS Excel, you can rotate  your texts. In my last post, I discussed how to wrap text to create multiple lines in a cell. But if you don't have sufficient option to create multiple lines, then you can rorate your text by some degrees. And definitely it will save your column space. 


Maybe most of you are familiar with text rotation. But I'm sharing this tips for the beginners. You will get the text rotation option at the same place where the wrap text is located. Both of them are located in the Alignment Tab in Format Cells dialogue box. 


Shortcut Method

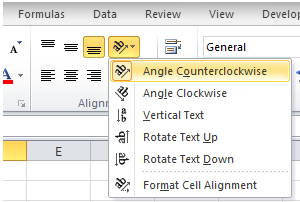
If you're using Excel 2007/ 2010, you can easily rotate text from ribbon. Go to the Home tab and then move to the Alignment section. Look at the image below:


Rotate Text by Mouse Click


First you have to select the cell which you wanna rotate. Then go to the text rotation icon and choose your desired rotation style. 


If you'd like to explore more options then press Shift+Ctrl+F > Go to the Alignment tab > Look at the Orientation option at the right of the window > Here you can rotate your text by degree. 

Alignment Tab in Format Cells Window


Text Alignment is really a useful tool in Excel. With this tool, you can reposition your text as your wish. In the ribbon, you can indent your text through text alignment section. You can position the text in the top, bottom, middle or left, right and center. 


You can also merge cells from text alignment section. And you just need to practice by yourself. Type text or numbers randomly. And try the each option by yourself. Within few days you will be an expert in formatting text in Excel!


Stay with Marks PC Solution to get more interesting IT topics!


Thứ Sáu, 20 tháng 6, 2014

Type Multiple Lines in a Cell in Excel

0 nhận xét

How to Type Multiple Lines in a Single Cell in Excel


Excel users often face a common problem. Normally you can't type two or three words in a cell in Microsoft Excel. You have to merge cells to type something. But if you have no option to merge cell horizontally then you may fall in trouble. Believe it or not, last week I had the same problem while working in a worksheet! 


Today I am sharing the solution with you. Look at the image below - 


Multiple Lines in a Row


By default, you can't type like the image above in MS Excel. Have you noticed - I haven't merge the rows or colums. And there are 3 lines in Column A and 4 lines in Column B. Try to type multiple lines in a row or cell. Simply you can't. You have to use the Wrap Text option to type multiple lines in a cell. 


For Excel 2003

Sorry to say, I don't have Microsoft Office 2003. So I can't show you the path. Probably you have to follow this way- 

Format Menu > Font > Format Cells > Alignment > Text Control > Wrap Tex (Check the box) > OK. 

I'm not sure about this command. But the main point is - find the format cells window and then check the wrap text from alignment tab. 

You can also press Shift + Ctrl + F to open Fomat Cells dialogue box. 


For Excel 2007 and 2010

In Excel 2007 or 10, the process is almost same. But as you have to use the ribbon interface, you have to follow this way - 


Wrap Text Under Alignment in Home Tab


Go to the Home Tab > Click on the Marked area of Alignment > Now you will get Format Cells window (Shift + Ctrl + F) > Choose Alignment tab > Check the Wrap text option > Hit OK. 


Shortcut Method!

Maybe it's very time consuming for you. I'm gonna share a secret shortcut! 

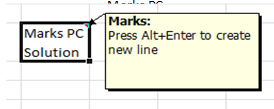
Type your text in cell, when the area ends, press Alt+Enter. You will get a new line in cell! See the image below: 


Multipe Lines in a Row


First I've typed Marks PC, then I pressed Alt+Enter and typed Solution. But remember, first you have adjust the column size. Adjust the column size and then type your text. Once you press Alt+Enter, new lines will be creating automaticlly when the cell area ends. 


There is another shortcut for you! Just look at the image below:


Wrap Text Icon in Home Tab

Have you noticed the market button? It's in the Alignment section, just below the Review Tab. This button is a shortcut to wrap text. Type your text and hit on this button to create multiple lines in a row/ cell. 


You can adjust the column size after typing the text. Your lines will be adjusted automatically. 


Stay with Marks PC Solution to get more interesting IT topics!


Thứ Bảy, 14 tháng 6, 2014

Change Photoshop Transparency Grid Color!!

0 nhận xét


If you're a Photoshop user, you must know about transparency grid. Transparency Grid is a checkerboard which appears when you're working with an image with transparent background. If your image has no color in the background, this checkerboard appears behind the image. 


Okay fine. Transparency will be indicated by the checkerboard. But you may ask, why I will change the color of transparency grid. In this post I'm gonna answer this question. And I will also show, how to change the color of the transparency grid. 


Why to Change? 

Suppose you've an image with white background. And you need to remove this background behind the image. You know there are different ways to remove background. I'm not gonna discuss it here. 

In the critical part of the image, Magic selection tool may not be able to select the white part. In that situation you can manually select the unselected portion. But you may also fail remove the white background properly. Because you can't select the white background as your default transparency grid is looks like a checkerboard that contains white color! So after saving the image you will notice there are some scattered white spots in the background. 

To get rid of this problem, you can change the default transparent grid. 


How to Change? 

Very simple. I'm using Photoshop CS5. Run Adobe Photoshop from your PC and follow the instruction - 

  1. Go to the Edit Menu.
  2. Select Preferences > Choose Transparency & Gamut.
  3. Now you will get the Preferences window with Transparency option selected.
  4. Keep the Grid size Medium or as your wish.
  5. Choose Dark from Grid Colors. Or you can customize the color using the custom option. You can also use any other color from the list if any of them is suitable for you. 
  6. Hit OK after choosing the Grid colors. 


Remember, the default grid color may need to changed when you're gonna remove any white background from your image. Or background that is light black. Otherwise you don't need to change it. 


Turning off the Grid!

You can totally turn off the grid! Yes! If you're bored with the grid that is shown for transparent layer, then you can turn off the grid from preferences window. 

Go to the Grid size as shown in the image above. And choose None. Now create a new document from your Photoshop with transparent layer. You will just see white background instead of a grid. But your image will have transparent layer. 


Stay with Marks PC Solution to get more interesting IT topics!


Thứ Ba, 10 tháng 6, 2014

Twist Image by Liquify Effect

0 nhận xét

Photoshop Liquify Effect


By default, Adobe Photoshop contains numerous attractive effects/ filters. And you can also add third party filters if you want. Today I will show the use of liquify filter which can be used to twist an image or object. And it's really a useful tool when you need to distort the photos of your friends! You can make their faces bizarre! :) 


I'm using Photoshop CS5 Extended Version. Hopefully the commands and options will be almost same with other versions of Photoshop. Let's start - 


  1. Run Photoshop and open an image from your hard disk. 
  2. Now go to the Filter Menu and choose Liquify (Shift+Ctrl+X).
  3. Now your image will be opened in a new window. 
  4. Mouse pointer will take the form of a plus sign with circle. 
  5. Hit and move the pointer over the image. 
  6. Rotate and twist the image as your wish. 
  7. If you're done press OK. Or if you wanna cancel, hit the Cancel button or press Esc. 

There are some additional options too! Look at the tools panel of liquify filter - 


Liquify Options

By default, you're getting the first tool selected. You can also try the other tools. They will produce a completely different result. 


You may need to adjust the brush size. Press and hold the right bracket ] to increase the brush size. And press and hold down the left bracket [ to decrease the brush size. 


Also try the Tool options from the right panel. Here you can change the Brush Size, Density, Pressure etc. Hit OK to save your changes to the image. Or press cancel if you don't like to distort the image. 

And don't forget to try the other commands of Filter menu. These are really cool! 


Hope you've enjoyed this post. If you have any query please leave a comment . . .


Stay with Marks PC Solution to get more interesting IT topics!


Thứ Ba, 3 tháng 6, 2014

Working with Photoshop Color Range

0 nhận xét

Photoshop Color Range Command


Photoshop guys are very familiar with the color range option of Adobe Photoshop. Color range command is a great tool for selecting the areas of an image based on sampled color. And it's somewhat similar to Magic Wand Tool. In Magic Wand Tool you need to manually click on the areas of an image that needs to be selected. But if you use the color range option, you just need to choose the sample color. And Photoshop will make the selection by itself! 


This tutorial applies to all running versions of Adobe Photoshop including CS4, CS5 and CS6. But I've prepared the tutorial using Photoshop CS5. All the images of this post will be based on Photoshop CS5. 


Color Range

Color Range belongs to the Selection part of Photoshop. You will find it under the Select Menu. Run Photoshop from your PC > Open an image from your hard disk > Go to the Select menu > Choose Color Range. You will get the following image: 


Color Range Window in Photoshop CS5


Have you noticed Marks PC Logo on color range window? Here the white part is currently selected. If you would like to expand the selection area then click on the pencil button from the right side with plus mark. Now go to your image and hit on the part that you want to add to your selection. 


Make sure Sapmled Colors is enabled in the Select option. 


You can also increase/ decrease the amount of Fuziness adjust the selection. If you make any wrong selection or if you'd like to remove something from your selection then choose the Pencil button with negative sign. Then hit on the part of image you want to deslect. 


Eyedropper Tools

The three tools just below the Save button is know as eyedropper tools. The left one is called Eydropper, middle one is Add to Sample and the right one is Substract from Sample


Fuziness and Range

I've told earlier that Fuziness will control the amount of selection. By increasing and decreasing the range, you can control the amount of selection. And Range will control how much area of the image will be selected. 


To be honest, color range command is somewhat difficult to explain. You need to practice it by yourselft. If you click on the options, increase or decrease the value of different fields, you can easily understand. So, try to explore! 


Stay with Marks PC Solution to get more interesting IT topics!


Thứ Bảy, 31 tháng 5, 2014

Quantify your Site by Quantcast

0 nhận xét

Quantcast - A Great Tool for Audience Measurement


Hello bloggers! Hope you're doing fine in blogging. Today I'm gonna write a review on Quantcast. Actually quantcast is a great site for audience measurement tool. You can collect huge information through Google Analytics. But I think Google Analytics is too heavy and sometimes it's really difficult to use. In that case, quantcast is more comfortable and convenient for the webmasters. 


Quantcast is also capable of showing the real time situation of your site worldwide! Yes! Just like Google Analytics, quantcast can fetch your real time visitors through world map. Thus you can see who is in your site right now. 


Do you use Web Rank Toolbar? I've found quantcast from Web Rank Toolbar. Earlier whenever I opened Web Rank Toolbar in Iron Browser, I saw my site is not ranked by quantcast. Because quantcast only measures your site when you set up its code in your site. 


Then I implemented quantcast code in my site and get it quantified! See the current status below: 


Or you can directly visit quantcast to check the status of Marks PC Solution. Hit on the  quantcast image button: 


Quantcast Large Logo


If you would like to qantify your site, follow the method below:

Open a new tab in your browser and type - 

https://www.quantcast.com/markspcsolution.com

Just replace the red part of the URL with yours. Now go to this address. Check your site's rank if available. And also look upper right corner. You will see - Not quantified. If your site is already qantified then you will see Quantified button. 


How to get Quantified? 

In order to get quantified, you must have an account with quantcast. I know most of you have no account qith quantcast. First open an account there and follow the steps below. 


  • Look at the right panel - Add a Website. Hit on it. 
  • A new window named General Tag will pop up. 
  • Enter your site's URL. ie. http://www.markspcsolution.com
  • Copy the code from Your Tag and paste it just before the </body> tag in your site.
  • Now hit on the Submit Site button. 

Wait for a few days. You will get an email notification when your site gets quantified. 


Code Implementation Help for Blogger


Directly go to Blogger Dahsboard/ Control Panel > Now go to Template > Edit HTML > Press Ctrl + F within HTML Layout > type </body> > Place the copied code just before the ending body tag. That's it.


You can also check - Working with New HTML Template Editor. Here you will learn, how to work with the new HTML template editor of blogger. 


Real Time Status


To check the real time you have to enter this URL - 

https://www.quantcast.com/labs/real-time/site/

Now after the site/, enter your site's address - markspcsolution.com


Stay with Marks PC Solution to get more interesting IT topics!